
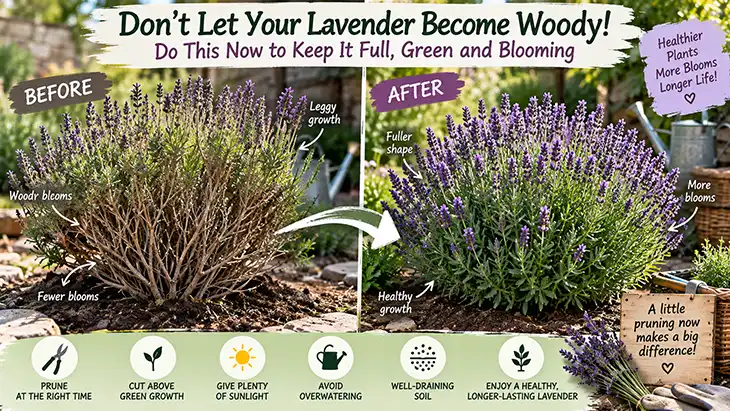
When lavender plants are young, they often present an almost perfect image: a compact shrub with silvery-green foliage, a delightful fragrance, and a profusion of flowers.
However, over the years, a noticeable transformation begins to occur.
The center of the plant starts to open up as thick, brown stems become visible beneath the foliage. New growth tends to concentrate only at the tips of elongated branches, and what was once a rounded, full bush gradually becomes sparse, woody, and looks tired.
This is partly natural since lavender is a woody shrub, not a delicate herbaceous plant. Over time, its stems naturally become harder and more lignified.
That said, there is a significant difference between this normal woody maturation and lavender that prematurely hollows out, becoming bare inside and extremely difficult to rejuvenate.
The best way to avoid this is not to wait until the plant ages before performing severe pruning.
The key is to prune regularly while the plant still has plenty of green shoots.
Once lavender has turned into a dense mass of old wood without any leaves, restoring its original shape becomes a much more complicated task.
Here, we explain how to take action now—covering when to prune, where to cut, and which mistakes to avoid to prevent permanently damaging a healthy lavender.
Why Does Lavender Become Woody?
Each year, lavender produces new green shoots from older stems.
As these stems mature, the base turns brown and woody, forming the permanent framework that enables the shrub to survive through multiple seasons.
Some degree of lignification is completely natural.
However, problems develop when plants are allowed to grow tall and wide without sufficient pruning year after year.
Over time, new leafy growth shifts increasingly toward the tips, leaving the interior bare and woody.
This leads to:
- Long, leafless stems
- An open, hollow center
- Foliage restricted solely to branch tips
- Branches that droop
- A plant that loses cohesion
- Fewer attractive flowering shoots
- An irregular, sprawling shape
At this advanced stage, merely cutting the plant back to its original size is often insufficient.
Many lavenders do not reliably regenerate from old, completely leafless wood.
This is why prevention is so important.
Essential Rule: Never Wait Until Lavender Is Completely Woody
Regular pruning encourages branching near the plant’s main framework.
By properly shortening young leafy shoots, you help maintain a dense network of compact growth points.
If pruning is neglected for several years, the green growth progressively moves outward and away from the center.
To put it simply:
Small, regular prunings prevent the need for drastic and risky cuts later on.
When to Prune Lavender?
The ideal timing varies depending on the type of lavender and your regional climate, but generally, two optimal pruning periods can be identified:
In Spring
This is the perfect moment to remove any winter damage and shape established plants once new growth reveals which stems remain alive.
After Flowering
A second pruning after the main flowering period removes faded flower stems and helps maintain the plant’s compact shape.
In areas with cold winters, avoid heavy pruning late in autumn.
Exposure to frosts after stimulating fresh growth late in the season makes the new shoots especially vulnerable to winter damage.
If Pruning in Late Summer or Early Autumn, Proceed as Follows:
Once summer flowering has ended, you may notice the plant looking untidy due to dry flower stems protruding through the foliage.
This is an excellent time to perform cleanup.
However, do not treat lavender like a hedge and cut it back to bare branches.
Step 1: Remove Dead Flowers
Begin by cutting away faded flower stems.
You may also remove a small amount of foliage just below these when shaping the shrub.
This instantly improves the plant’s appearance.
More importantly, it allows you to see the actual structure more clearly.
Step 2: Look for Green Growth
Before making any significant cuts, follow each stem down to its base.
You will notice where younger, leafy growth transitions into old brown wood.
The objective is usually to prune while there are still healthy green shoots remaining below the cut.
Do not cut all stems at the same height blindly.
Step 3: Create a Rounded Shape
Lavender naturally forms a harmonious mound-shaped structure.
Shorten any overly long stems and gently shape a rounded outline on the outer edges of the foliage.
Avoid creating a completely flat top.
A natural dome allows sunlight to penetrate evenly, supporting the plant’s aesthetic and overall health.
Step 4: Do Not Over-Prune
For routine maintenance, removing about one quarter to one third of the foliage is typically sufficient.
The precise amount depends on the plant’s condition, variety, time of year, and climate.
As winter approaches, especially in colder regions, err on the side of caution.
Why Should You Never Cut Lavender to the Ground?
This is arguably the most common mistake when pruning lavender.
You may see a large, woody shrub and think:
“I’ll cut everything back to start fresh.”
This technique works well for some herbaceous plants.
Not with lavender.
If you remove all the foliage and leave only bare, old stems, the plant will produce few to no new shoots.
Before long, a lavender that was once living but somewhat unsightly can become a lifeless mass of dead branches.
Before making any major cut, ask yourself:
Are there healthy shoots below where I plan to cut?
If there are none, it’s wiser to reconsider your pruning plans.
Do Not Neglect Spring Pruning Either
In regions with harsh winters, spring is often the safest time for more significant annual pruning.
However, do not prune too early.
At the end of winter, lavender may look gray and lifeless, even though the stems are still alive.
Wait for unmistakable signs of new growth to emerge.
Then examine the plant carefully.
Remove Truly Dead Branches
Test questionable stems by gently scraping a small section of bark.
If you see green tissue beneath, the stem is alive.
If the tissue is brown, dry, and brittle, the stem is dead.
Remove only those stems that are truly dead, preserving as much living wood as possible.
Shape the Remaining Plant
After winter passes, shorten healthy leafy shoots to encourage a compact growth form.
Again, avoid cutting deeply into old bare wood just to achieve a perfectly symmetrical look.
The health of the plant must take priority over perfect symmetry.
What If Your Lavender Is Already Woody?
Handle with care.
If the plant has a woody center but still retains numerous green shoots, you should not panic.
A base of woody stems is entirely normal for an older lavender.
Your goal should be to prevent the spread of bare areas.
Favor Gradual Improvement
Instead of removing half the plant all at once:
Start by removing dead branches.
Shorten excessively long leafy shoots.
Maintain a rounded overall shape.
Preserve old wood that still bears healthy growth.
Continue with moderate pruning every year.
This gradual approach is far safer than attempting a radical renovation.
Is It Possible to Rejuvenate an Old Woody Lavender?
Sometimes it is, though there are no guarantees.
Some lavenders regrow better than others from their lower parts — particularly if buds or young shoots are still visible.
Do not expect regrowth from completely bare, old wood.
If you spot small green shoots low on a branch, severe pruning becomes a more viable option.
However, if a branch is brown and completely leafless for a significant length, drastic pruning carries a higher risk.
For a very old, sprawling plant with little foliage only at the branch tips, it might be more practical to replace it eventually.
Consider taking cuttings from healthy young shoots before removing the plant entirely.
This will allow you to replace it effectively.
Take Cuttings Before It’s Too Late
This is one of the best ways to safeguard aging lavender.
Healthy shoots that are not flowering or just slightly mature can be propagated.
Choose vigorous branches free from disease and pests.
Remove the lower leaves and root them using appropriate methods.
If your old lavender eventually dies, you will already have several young plants ready to replace it.
These young plants can be properly shaped right from the beginning.
Start Pruning Lavender Early While Young
Do not allow your lavender to become overly large before intervening.
Once planted lavender is well established and growing vigorously, light pruning encourages branching.
A plant with many branches near the base is much more likely to form a dense, compact mound.
A plant left to produce just a few large stems tends to become open and spindly.
This maintenance approach where a little effort each year greatly simplifies future repairs is extremely wise.
Do Not Confuse Woody Stems with a Dying Lavender
Brown stems at the base do not necessarily indicate your lavender is dying.
Remember: lavender is a woody shrub.
Look at the plant as a whole.
If it has:
- Bright green or silvery-green foliage
- Healthy new shoots
- Plentiful flowers
- Strong branches
- No widespread decline
Then the woody base is simply a normal sign of aging.
You need to prevent a situation where a bare, leafless area keeps expanding along with a reduction in foliage.
Pruning Alone Is Not Enough to Keep Lavender Compact
Even with perfect pruning, you may still end up with a weak, open bush if the growing conditions are suboptimal.
Several other factors influence the density of lavender plants.
1. Provide Maximum Sunlight
Lavender is a Mediterranean plant that thrives in full sun.
Most varieties perform best when exposed to at least 6 to 8 hours of direct sunlight daily. Abundant sunlight encourages denser growth and more abundant flowering.
In the shade, stems stretch toward whatever light is available.
This causes the plant to become:
- Taller
- More open and loose
- Less sturdy
- Less floriferous
No amount of pruning can compensate for insufficient light.
If your lavender often becomes spindly, reconsider its location.
2. Avoid Over-Fertilizing
It might seem logical that feeding lavender will make it healthier.
However, soil that is too rich or overuse of nitrogen fertilizers promotes rapid, soft, and weak vegetative growth.
Lavender naturally thrives in fairly poor soil.
Do not attempt to turn its planting site into the richest spot in your garden.
More fertilizer does not necessarily mean more flowers.
3. Excellent Drainage Is Essential
Woody lavender is not necessarily unhealthy.
But woody lavender with dying patches often signals drainage issues.
Lavender roots do not tolerate sitting in constantly wet soil.
Excess moisture can cause root and collar problems that lead to:
- Browning foliage
- A grayish appearance
- Weak branches
- Dead sections
- Rapid decline
Ironically, in response to dried and browned foliage, some gardeners water even more.
Always check the condition of the soil before watering.
4. Do Not Let the Collar Get Buried Under Moist Mulch
A thick layer of organic mulch piled against the lavender stems can keep the collar too moist.
Allow the base of the plant to breathe freely.
Under favorable conditions, a mineral mulch like gravel is often preferable for lavender because it does not hold moisture around the collar like organic mulches do.
Whatever mulch you choose, avoid piling it excessively against the plant’s base.
5. Give Each Plant Enough Space
It is tempting to plant young lavenders very close together to fill in bare patches quickly.
But remember, they grow.
Mature plants that are crowded have less air circulation and compete for light.
Check the mature width of your lavender variety when planning spacing.
It is better to give young plants some room than to have to deal with overcrowded, unhealthy shrubs years later.
6. Do Not Water Mature Lavender Like a Thirsty Annual
Newly planted lavender requires more attention to watering during its rooting phase.
But a well-established plant is different.
Once well rooted in suitable soil, lavender tolerates drought remarkably well.
Frequent, shallow watering can create moist conditions around the roots that are less than ideal.
When irrigating, prefer deep, infrequent watering to maintaining a constantly moist surface.
Potted lavender requires special care since containers dry more quickly. Adjust watering schedules accordingly.
Lavender in Pots: Specificities of Pruning and Care
Plants grown in pots can also become woody.
Pruning guidelines remain similar:
- Prune regularly
- Maintain green foliage below cuts
- Remove dead flowers
- Avoid heavy pruning late in the season
- Provide plenty of light
Drainage is especially crucial in containers.
Choose pots with drainage holes and avoid letting the plant sit in standing water.
Pot size matters: too small restricts root growth and dries quickly; too large may retain too much moisture.
English Lavender, Lavandin, Spanish Types: Varied Lavender Behaviors
The term “pruning lavender” does not mean exactly the same thing for all types of lavender, as they behave differently.
English Lavender (Lavandula angustifolia)
This is usually the most cold-hardy species, grown as a perennial in cooler climates.
It responds well to regular pruning as long as green growth is present.
Lavandin (Lavandula × intermedia)
Lavandin shrubs can grow large and vigorous. They particularly benefit from annual pruning to prevent excessive spreading.
Spanish and French Lavenders
These types are less hardy and may flower variably depending on the climate.
Thus, pruning schedules are generally more flexible for these varieties.
Where possible, identify your lavender type rather than applying generalized care instructions.
The “Green Foliage” Rule Simplifies Pruning
If you remember only one thing from this article, let it be this:
Before cutting a branch, look below your intended cut point.
If you see healthy leaves and active growth below, you are usually pruning safely.
If the cut would leave a completely bare stub, stop immediately.
This simple visual check prevents one of the most common errors in lavender pruning.
7 Common Mistakes That Accelerate Lavender Lignification
Mistake 1: Never Pruning
The plant gradually grows taller, sparse, and woody.
Better approach:
Perform appropriate pruning each year.
Mistake 2: Waiting Until the Plant Is Old to Start Pruning
Once the lower branches are bare, your options for shaping become limited.
Better approach:
Begin shaping young plants early after establishment.
Mistake 3: Cutting Into Old Bare Wood
This practice leaves permanently dead branches that will not regrow.
Better approach:
Leave healthy foliage below maintenance cuts.
Mistake 4: Over-Severe Pruning Before Winter
Young shoots become vulnerable to frost damage.
Better approach:
Perform moderate pruning late in the season in cold climates and save heavier pruning for spring.
Mistake 5: Growing Lavender in the Shade
Shade encourages lanky, bare, and weak growth.
Better approach:
Provide abundant, direct sunlight.
Mistake 6: Excessive Feeding
Too much fertilizer promotes soft, unattractive foliage growth.
Better approach:
Adjust nutrition to your soil and use fertilizers moderately.

Get a Head Start on Your Garden: Indoor Sowing for Colder Climates There's no need to wait for spring's embrace Read more

Bananas are a delightful treat, but their peels can be a garden's treasure. Rather than discarding banana peels into compost, Read more
Deadly Nightshade (Atropa belladonna): The Mysterious and Dangerous Plant with a Dark Legacy At first glance, Deadly Nightshade (Atropa belladonna) Read more

Turmeric is a staple ingredient in Asian cuisine. This vibrant yellow spice, often used to flavor curries and stews, is Read more
Hydrangeas, with their breathtaking blooms, stand out as one of the most enchanting deciduous flowering bushes. If you've wandered through Read more
If your Christmas cactus has stayed healthy throughout the year but produced only a few flowers last winter, October might Read more

Lavender, a charming addition to any garden, is known for its enchanting aroma and vibrant purple hues. This plant comes Read more

Using White Vinegar for Garden Maintenance Gardening is never an easy task. Planting, weeding, and watering plants and flowers require Read more

The Importance and Care of House Plants House plants not only serve as a significant decorative element but also play Read more

Mastering Chilli Cultivation in Diverse Climates: A Detailed Guide It may seem unlikely, but growing chillies across different climates is Read more
Growing Chayote from Supermarket Fruit: Abundant Harvests Made Easy If you've ever strolled through the produce aisle and spotted a Read more
Three Little-Known Tips to Keep Your Potatoes in Perfect Condition Choosing the Right Location for Storage The way you store Read more

Unlocking the Flowering Potential of Anthuriums Anthuriums are renowned for their stunning, heart-shaped blooms which, under ideal conditions, can grace Read more

Orchids are renowned for their stunning blooms and are a favorite among indoor plant enthusiasts. However, getting these temperamental beauties Read more

Navigating Aloe Vera Care: Bypassing Usual Oversights Aloe vera, celebrated for its therapeutic properties and eye-catching demeanor, is occasionally compromised Read more

Orchids, with a staggering 28,000 unique species, beautifully demonstrate nature's rich tapestry of diversity. Originating from the Orchidaceae lineage, these Read more

Transforming Garlic Peels into Gold for Gardeners: In the rhythm of kitchen prep, garlic peels are often discarded without a Read more

Wild Medicinal Plants: Harnessing the Hidden Virtues of Earth’s Greenery In the wilderness of our environment—ranging from the expanse of Read more

Understanding Fertilizers for Plants Fertilizer is a product that can be spread or mixed into the soil to provide plants Read more

Different perspectives exist on various aspects of nature, and this holds true for the dandelion, often dismissed as a mere Read more
Exploring the World of Eggplants: A Gardener's Guide Eggplants, with their divisive nature, are often a subject of culinary debate. Read more

In this exploration, we uncover eight homemade, natural solutions that act as effective rooting agents for plant propagation through cuttings. Read more

Insect-Repelling Greenery: Your Natural Home Defense Transform your home into a sanctuary free from the annoyance of insects such as Read more

Cultivating an Avocado Plant Indoors: A Step-by-Step Guide Nurturing an avocado seed into a blossoming plant within the confines of Read more

Introducing 15 Health-Enhancing Indoor Plants for a Vibrant Home Oasis Embrace a selection of indoor plants that bring more than Read more

Cultivating Zucchini in Containers: A Comprehensive Guide Zucchini is a popular vegetable for gardening aficionados and novices alike. It's simple Read more
The Incredible Healing Power of Billygoat Weed (Ageratum conyzoides): 15 Health Benefits You Should Know About Billygoat weed, also known Read more
Searching for a distinctive method to incorporate some foliage into your home or workplace? Try cultivating plants hydroponically! Not only Read more

Using Baking Soda for Plant Care To care for your plants or your vegetable garden, have you considered the DIY Read more

Growing avocados can be a gratifying experience, especially when you cultivate them right in your backyard. While starting avocados from Read more
Unlocking the Mystery of the Festive Cactus The festive cactuses often baffle indoor gardeners. There's a lingering myth that these Read more

Tea, the staple of morning routines and afternoon breaks, may have a second life beyond the cup that's often ignored. Read more

Caring for orchids, known for their exquisite and delicate nature, involves a precise approach to hydration. Orchids differ from typical Read more
Nature provides us with countless remedies in the form of wild medicinal plants, surrounding us everywhere we go. These healing Read more

Indoor Plants: A Decorative Air Purifier Indoor plants have become an essential part of modern decor, increasingly sought-after to greenify Read more

If you don't often get the chance to rejuvenate in the midst of nature, there's an alternative: introducing plants to Read more

The Curious Case of Tomato Slices: A Journey from Kitchen Scrap to Sprout As someone always game for a gardening Read more
Indoor Plants and Their Benefits Indoor plants not only enhance the decor but also bring a touch of lush greenery. Read more
Self-Seeding Flowers: Effortless Beauty That Returns Every Year When I first fell in love with gardening, my mother came to Read more

Gardening: The Harmony of Craft and Nature Gardening brings out a dance between human creativity and the wonders of nature. Read more
